Twitter/X Conversion API (CAPI): The Complete Setup Guide for 2026

Summary / TL;DR
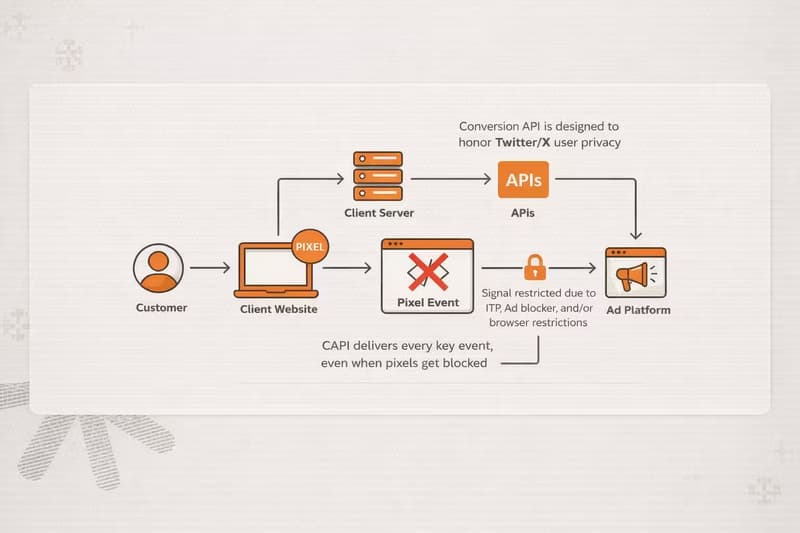
Twitter/X CAPI (Conversions API) is a server-to-server integration that sends conversion data directly from your server to X's ad platform — bypassing the browser entirely. Unlike the X Pixel, which relies on JavaScript firing in the user's browser, CAPI works even when ad blockers, iOS privacy restrictions, or cookie consent opt-outs would otherwise block tracking.
The pixel alone is no longer enough. In 2026, ad blockers, ITP, and consent opt-outs can account for 30–45% of untracked conversions — a structural blind spot that distorts your ROAS and misfires your campaign optimisation.
The recommended setup is both. Run the pixel for broad coverage and real-time signals, and CAPI for reliable server-confirmed events. A deduplication key ensures the same conversion is never counted twice.
This guide covers everything. How CAPI works under the hood, step-by-step setup, copy-paste code snippets, deduplication implementation, event parameters, and a full FAQ.
What is Twitter/X CAPI?
If you are running ads on X, conversion tracking is the foundation of any performance marketing setup. Without it, you have no way of knowing whether the people who saw or clicked your ads actually did anything meaningful afterwards. Conversion tracking lets you measure return on ad spend by connecting real user actions — a purchase, a sign-up, a download — back to the specific campaigns and creatives that drove them. Those same conversion signals also feed X's delivery algorithms, helping the platform optimise who sees your ads and when, so your campaigns get smarter over time rather than just burning budget.
Twitter/X CAPI — short for Conversions API — is a server-to-server integration that lets you send conversion events directly from your server to X's ad platform, completely bypassing the browser.
When a user completes an action on your website — say, a purchase, a form submission, or a subscription — instead of relying on a browser-fired JavaScript tag to report that event, your server sends the data directly to X via an HTTPS API call. No browser involved. No cookies required. No JavaScript to load.
This is the core distinction between the X Pixel and the Conversion API, and it matters enormously for data quality in 2026.
The X Conversion API supports two categories of events:
Web Events — Actions that happen on your website, such as page views, add-to-cart events, purchases, lead form submissions, and more.
Offline Events — Conversions that happen outside of your website entirely: in-store transactions, call centre bookings, CRM-recorded sales, or any event that takes place after the user has left your digital properties.
Twitter/X Pixel vs. Twitter CAPI or Conversion API: What's the Difference?
Before diving into the CAPI setup, it's worth understanding the difference between pixel and conversion API, and what separates them from the X Pixel, and when you'd choose one over the other.
The X Pixel
The X Pixel is a client-side JavaScript tag. It has two parts:
Base code — placed across all pages of your site. It initialises the pixel, tracks site visits, and enables audience creation.
Event code — placed on specific actions (a purchase button, a thank-you page). It fires specific conversion events with optional parameters.
The pixel works well and is the recommended starting point for most advertisers. Its biggest strength is ease of implementation. Its biggest weakness is that it depends entirely on the browser to function — and the browser environment in 2026 has become a hostile place for tracking.
The Conversion API
CAPI is a server-side integration. Instead of a JavaScript tag firing in someone's browser, your server makes a POST request directly to X's API every time a conversion event occurs. The browser has no role in this process.
Why the X Pixel Is No Longer Enough
This section is the honest reason you are reading about CAPI. The pixel has not changed — the environment around it has. Understanding exactly what breaks and how much signal you are losing is what makes the case for CAPI concrete rather than theoretical.
Ad Blockers Are Blocking Your Pixel
Ad blockers work by preventing known tracking scripts from loading in the browser. The X Pixel's JavaScript file — hosted on static.ads-twitter.com — is on every major blocklist. When an ad blocker is active, the pixel script never loads, and no events fire, regardless of what the user does on your site.
Ad blocker adoption is not a niche issue. Estimates for desktop usage sit around 35–40% globally in 2026, with higher rates in tech-forward, younger, and European audiences — precisely the demographics most valuable to many advertisers. If your primary audience skews toward these groups, a meaningful share of your actual conversions are invisible to your pixel.
CAPI is not affected by ad blockers. The request goes from your server to X's server. The user's browser configuration is irrelevant.
iOS Privacy Changes Have Degraded Cookie Reliability
Apple's Intelligent Tracking Prevention (ITP) has been eroding the effectiveness of browser-based tracking on Safari since 2017, and successive iOS updates have tightened restrictions further. ITP limits the lifespan of cookies set by JavaScript (like the ones the X Pixel relies on for attribution) to as little as 24 hours in certain scenarios, and restricts cross-site tracking categorically.
The result: a user who clicks your X ad on an iPhone, browses your site, and purchases three days later may not be attributed at all through the pixel — because the cookie that would have linked the click to the conversion has expired or been partitioned.
X addresses part of this with Click ID (twclid), which stores the click attribution in a first-party cookie rather than a third-party one, improving persistence on Safari. But even first-party cookies set by JavaScript face ITP restrictions. CAPI, combined with explicit twclid capture at the server level, gives you a more durable attribution path.
Consent Banners Are Creating Legal and Tracking Gaps
Under GDPR, CCPA, and a growing list of regional privacy regulations, a significant share of your users are being asked — and choosing — to opt out of tracking via Consent Management Platforms (CMPs). When a user declines cookies or tracking consent, the pixel should not fire. That is the legally compliant outcome.
But it means every user who opts out is invisible to your pixel. You cannot retroactively attribute their conversions. You cannot include them in optimisation signals sent to X. For advertisers in markets with high opt-out rates (Germany, France, and much of Northern Europe regularly see 30–50%+ opt-out rates on some CMPs), this is not a marginal problem.
CAPI, implemented correctly with the Restricted Data Use (RDU) parameter for opted-out users, allows you to send limited, compliant event data even in restricted-consent scenarios. You signal to X to limit how it uses that data, but you still pass the event, enabling some level of measurement and compliance-safe audience matching.
Browser-Side Tracking Is Fundamentally Unreliable
Beyond the specific issues above, there is a broader reliability problem with client-side tracking: you have no control over what happens in a user's browser. Pages close before tags load. Slow connections time out script execution. Corporate firewalls block external scripts. Browser extensions interfere with JavaScript. The user navigates away before the confirmation page loads.
Each of these scenarios produces a conversion that happened in reality but was never recorded by your pixel. Over time, the cumulative gap between actual business outcomes and what your X Ads account reports grows. That gap means your campaign performance looks worse than it is, your bidding algorithms optimise on incomplete data, and you are making budget decisions based on an undercount.
Server-side CAPI events are fired by your infrastructure, not the user's browser. If the API call succeeds, the event is recorded — full stop.
The Cumulative Impact
To make this concrete: if 35% of your users have ad blockers, 25% are on Safari with ITP restrictions, and 20% opt out of tracking via your CMP, with significant overlap between these groups, realistically, 30–45% of your conversions are not being captured by the pixel alone. That is not a minor data quality issue. That is a structural blind spot that affects every campaign decision you make.
CAPI does not fix all of this perfectly (match rates depend on the quality of identifiers you can pass), but it meaningfully closes the gap. That is why X themselves have increasingly positioned CAPI not as an advanced option for technical teams, but as a standard part of a complete measurement setup.
How Twitter/X CAPI Works: Under the Hood
Understanding the mechanics helps you implement CAPI correctly and troubleshoot issues when they arise.
When a user converts on your site or in your systems, here is what happens in a native CAPI setup:
The conversion event occurs (e.g., a purchase is completed and confirmed by your server).
Your server collects the event data: event type, timestamp, relevant parameters (value, currency, product IDs), and available user identifiers (hashed email, hashed phone number, or click ID).
Your server makes a POST request to the X Ads API endpoint:
https://ads-api.twitter.com/12/measurement/conversions/<PIXEL_ID>The request body contains the event payload in JSON format.
X's system receives the event, attempts to match it to an X user using the provided identifiers, and attributes it to the relevant ad campaign if applicable.
The user matching step is critical. X attempts to match the conversion event back to a real X user using several signals, in rough order of reliability:
twclid (X Click ID) — The most reliable signal. This is a unique identifier X appends to your landing page URL when a user clicks your ad. If you capture and store this parameter, passing it back via CAPI gives X a direct, deterministic match.
Hashed email address — SHA-256 hashed email of the converting user.
Hashed phone number — SHA-256 hashed phone number.
IP address + User Agent — Used as a probabilistic fallback.
The quality of your Ebent Match Quality (EMQ) directly determines how many conversions get attributed, how well your campaigns optimise, and how accurate your reporting is. Richer user signals = higher match rates = better results.
Setting Up the X Conversion API: Step-by-Step
Step 1: Access Events Manager
Log in to your X Ads account at ads.x.com. Navigate to Tools → Events Manager.
If you don't see a Tools tab, you likely haven't added a payment method to your account yet. Add one first.
Step 2: Create or Locate Your Pixel
Click Add event source. Accept the X terms of use.
If you've created an X Pixel before, it will appear in the left pane. Your Pixel ID is the alphanumeric string associated with your pixel (e.g., o6ou1). You will need this for your API calls.
If this is your first time, you'll be taken to the "Install pixel code" page. You can choose whether to allow first-party cookies — this is recommended, as it enables Click ID functionality, which improves conversion measurement beyond landing page visits. Click Save event source.
Step 3: Create Your Conversion Events
Back in Events Manager, click Add events. You'll need to create one event for each action you want to track.
On the Event Details screen:
Give the event a clear name (e.g., "Purchase", "Lead Form Submit").
Choose the event Type from the dropdown (Purchase, Lead, Add to Cart, etc.).
Set your attribution window.
Optionally toggle on "Website activity audience" to build retargeting audiences from this event.
Click Next.
On the Setup method screen, select "Define event with code". This gives you the most flexibility and allows you to pass event parameters.
On the Event installation screen, select the Conversion API tab to get your event-specific details.
Note down your Event ID (it looks like tw-o6ou1-o9l96). You'll use this in your API calls.
Step 4: Generate Your API Access Token
Before you begin, confirm you have an active X Developer Account. Without one, you will not be able to access the X Ads API or generate the credentials required for CAPI. If you don't have one yet, apply at developer.twitter.com. Approval is typically straightforward for advertisers with an active ad account.
To authenticate your CAPI requests, you need credentials from the X developer platform.
Go to developer.twitter.com and log in with the same account used for ads.
Create an app (or use an existing one) with Read and Write permissions.
Generate your Access Token, Access Token Secret, Consumer Key, and Consumer Secret using OAuth 1.0a.
You will need all four values in your server-side code.
Step 5: Understand the API Endpoint and Request Format
The base endpoint for web conversion events is:
POST https://ads-api.twitter.com/12/measurement/conversions/<PIXEL_ID>Replace <PIXEL_ID> with your actual pixel ID.
Required headers:
Content-Type: application/json
Authorization: OAuth ...  (your signed OAuth 1.0a header)
Request body structure:
json
{
  "conversions": [
    {
      "conversion_time": "2026-03-15T14:30:00.000Z",
      "event_id": "tw-o6ou1-o9l96",
      "identifiers": [
        {
          "twclid": "2as3i9j5qt5tcl7d48sxs1"
        },
        {
          "hashed_email": "b64302ce4aff5...sha256hashedvalue"
        }
      ],
      "conversion_id": "order_123456",
      "value": "199.99",
      "currency": "USD",
      "number_items": "2",
      "contents": [
        {
          "content_id": "SKU-001",
          "content_name": "Running Shoes",
          "content_price": "99.99",
          "num_items": "1"
        },
        {
          "content_id": "SKU-002",
          "content_name": "Running Socks",
          "content_price": "100.00",
          "num_items": "1"
        }
      ]
    }
  ]
}
Important notes on the request body:
conversion_timemust be in ISO 8601 format (UTC). X rejects events older than 90 days or timestamped in the future.event_idis your specific event identifier from Events Manager.identifiersis an array — pass multiple identifiers for higher match rates.conversion_idis critical for deduplication (covered in detail below).valueandcurrencyshould be included for purchase events to enable revenue reporting.
Sending Web Events via CAPI
Here's a practical server-side implementation in Node.js for a Purchase event:
javascript
const crypto = require('crypto');
const OAuth = require('oauth-1.0a');
const fetch = require('node-fetch');
// Configuration
const PIXEL_ID = 'your_pixel_id';
const EVENT_ID = 'tw-your_pixel_id-your_event_id';
const API_URL = https://ads-api.twitter.com/12/measurement/conversions/${PIXEL_ID};
// OAuth 1.0a Setup
const oauth = OAuth({
consumer: {
key: process.env.X_CONSUMER_KEY,
secret: process.env.X_CONSUMER_SECRET,
},
signature_method: 'HMAC-SHA1',
hash_function(base_string, key) {
return crypto.createHmac('sha1', key).update(base_string).digest('base64');
},
});
const token = {
key: process.env.X_ACCESS_TOKEN,
secret: process.env.X_ACCESS_TOKEN_SECRET,
};
// Hash user identifiers — NEVER send unhashed PII
function hashIdentifier(value) {
return crypto
.createHash('sha256')
.update(value.trim().toLowerCase())
.digest('hex');
}
// Send conversion event
async function sendConversionEvent({
userEmail,
userPhone,
twclid,
orderId,
orderValue,
currency,
items,
}) {
const identifiers = [];
// Add all available identifiers for maximum match rate
if (twclid) identifiers.push({ twclid });
if (userEmail) identifiers.push({ hashed_email: hashIdentifier(userEmail) });
if (userPhone) identifiers.push({ hashed_phone_number: hashIdentifier(userPhone) });
const conversionPayload = {
conversions: [
{
conversion_time: new Date().toISOString(),
event_id: EVENT_ID,
identifiers,
conversion_id: orderId, // Used for deduplication
value: String(orderValue),
currency: currency,
number_items: String(items.reduce((sum, item) => sum + item.qty, 0)),
contents: items.map((item) => ({
content_id: item.sku,
content_name: item.name,
content_price: String(item.price),
num_items: String(item.qty),
})),
},
],
};
const requestData = { url: API_URL, method: 'POST' };
const authHeader = oauth.toHeader(oauth.authorize(requestData, token));
const response = await fetch(API_URL, {
method: 'POST',
headers: {
...authHeader,
'Content-Type': 'application/json',
},
body: JSON.stringify(conversionPayload),
});
const result = await response.json();
if (!response.ok) {
console.error('CAPI Error:', result);
throw new Error(CAPI request failed: ${response.status});
}
console.log('Conversion sent successfully:', result);
return result;
}
// Example: call this on order completion
async function onOrderComplete(order, user) {
await sendConversionEvent({
userEmail: user.email,
userPhone: user.phone,
twclid: order.twclid, // Retrieved from cookie or session
orderId: order.id,
orderValue: order.total,
currency: 'USD',
items: order.lineItems,
});
}
Capturing the twclid
One of the highest-impact things you can do to improve CAPI match rates is capture and store the X Click ID (twclid). When a user clicks your ad, X appends ?twclid=xxxxx to your landing page URL. You need to capture this at the moment the user arrives and persist it until conversion.
javascript
// Client-side: on page load, capture and store twclid
function capturetwclid() {
const urlParams = new URLSearchParams(window.location.search);
const twclid = urlParams.get('twclid');
if (twclid) {
// Store in first-party cookie — 30-day expiry
document.cookie = twclid=${twclid}; max-age=2592000; path=/; SameSite=Lax;
}
}
// Retrieve it at checkout to pass to your server
function gettwclid() {
const match = document.cookie.match(/(?:^|;\s*)twclid=([^;]*)/);
return match ? match[1] : null;
}
Pass this value to your server at checkout and include it in your CAPI payload. This single step can meaningfully lift your attribution rates.
Deduplication: The Most Overlooked Step
If you are running both the X Pixel and the Conversion API — which you should be — the same conversion will often be reported twice: once by the pixel in the browser and once by your server-side CAPI call. Without deduplication, X counts both. Your conversion numbers inflate, your ROAS looks artificially high, and your optimisation algorithms receive conflicting signals.
This is not an edge case. It is the default outcome if you do not implement deduplication.
How X's Deduplication Logic Works
X deduplicates events using the conversion_id parameter. When X receives two events with identical conversion_id values, it counts them as a single event.
The deduplication window varies by event type:
Page View events (including auto-created Site Visit and Landing Page View): deduplicated within a 30-minute window.
All other event types (Purchase, Lead, Add to Cart, etc.): X does not automatically deduplicate these, making the
conversion_idparameter your primary and only mechanism for preventing double-counting.
Implementing Deduplication Correctly
The rule is simple: every pixel-fired event and its corresponding CAPI event must share the same conversion_id.
1. The X Pixel event (client-side):
// Generate a unique conversion ID once per conversion
const conversionId = order_${orderId}_${Date.now()};
// Fire pixel event with conversion_id
twq('event', 'tw-pixel_id1-event_id1', {
value: 199.99,
currency: 'USD',
conversion_id: conversionId,
email_address: userEmail,
contents: [
{
content_id: 'SKU-001',
content_name: 'Running Shoes',
content_price: 99.99,
num_items: 1,
},
],
});
// Pass conversionId to your server for the CAPI call
fetch('/api/track-conversion', {
method: 'POST',
body: JSON.stringify({ conversionId, orderId, userEmail, ... }),
});
2. The CAPI server-side call:
// Use the same conversionId passed from the client
await sendConversionEvent({
orderId: conversionId, // Matches the pixel event
userEmail: userEmail,
twclid: storedtwclid,
orderValue: 199.99,
currency: 'USD',
items: orderItems,
});
When X receives both events with the same conversion_id, it deduplicates them and records a single conversion.
Deduplication Best Practices
Make conversion IDs truly unique. A bare order ID (e.g., 12345) risks collisions if a user reloads the confirmation page or the pixel fires twice. Append a timestamp to make each event fire unique: order_12345_1710506400000.
Generate the ID on the client, and share it with the server. Don't generate the conversion ID independently on both sides — they need to match exactly. Generate it at the moment of conversion (client-side), then pass it to your server along with the other conversion data.
Build retry logic with logging. If your CAPI call fails, the pixel-fired event may still go through without a server-side counterpart. Log every CAPI request and response, retry on 5xx errors with exponential backoff, and alert on persistent failures.
Verify in Events Manager. Use the Recent Activity Log (hover over your event → select "View Activity") to inspect incoming events and confirm deduplication is functioning correctly.
Running Both: Pixel + CAPI Together
This is the setup X recommends for any advertiser who wants complete measurement. Think of the two layers as complementary, not competing.
The X Pixel handles:
Auto-created Site Visit and Landing Page View events
Real-time browsing behaviour signals for audience building
Click ID capture via first-party cookies
Low-friction coverage across all pages
CAPI handles:
Conversions for users with ad blockers or restricted cookie environments
Server-confirmed purchase and lead events (more authoritative than browser-fired)
Offline conversions from CRM or call centre data
High-value events where data reliability is critical
The deduplication layer ensures there is no double-counting between them. The pixel is your broad sensor. CAPI is your authoritative source of truth. When both fire for the same event, it's deduplicated. When only the server-side fires (because the pixel was blocked), CAPI picks up the slack.
Event Types and Parameters Reference
Available Event Types
Event Parameters
Contents Array Sub-Parameters
Dynamic Product Ads: Required Events
If you are running Dynamic Product Ads on X, these four events are mandatory:
Page View — fires on browse pages showing multiple products (e.g., category or sale pages)
Content View — fires on individual product detail pages; must include
content_id(SKU)Add to Cart — fires when a product is added to the cart; must include
content_idPurchase — fires on order confirmation; must include
content_id,value, andcurrency
How Zappush Makes This Native and Effortless
X officially partners with a handful of third-party platforms, Adobe, Tealium, Metarouter, Datahash, and Rudderstack, that can help you integrate with CAPI without building it from scratch. If you already work with one of these, they are a viable starting point. The tradeoff is that all of them route your conversion data through their own infrastructure before it reaches X, adding a middleware layer, an additional vendor dependency, and, in some cases, latency. That distinction matters if data ownership and pipeline reliability are priorities for your business.
Setting up Twitter/X CAPI correctly capturing twclid, hashing user identifiers, implementing deduplication, handling API retries, and maintaining the integration as X's API evolves is real engineering work. Most teams either skip critical steps and leave performance on the table or depend on third-party middleware tools that introduce latency, vendor lock-in, and another monthly line item.
Zappush takes a different approach: native server-side implementation.
Rather than routing your conversion data through an intermediary platform, Zappush connects directly from your store infrastructure to X's Conversions API. This means:
No middleware latency. Events are sent from your server to X in real time, without being queued through a third-party service.
No vendor lock-in. Your first-party data stays within your own infrastructure. You own the pipeline.
Deduplication is built in. Every CAPI event is automatically paired with the correct conversion ID - pixel, and server-side double-counting is handled without manual configuration.
twclid capture and forwarding. Zappush handles Click ID persistence at the session level and includes it in every eligible CAPI event, maximising match rates out of the box.
Ongoing maintenance handled. When X updates their API versioning or changes parameter requirements, Zappush updates the integration - you don't need to touch your code.
If you're evaluating whether to build this in-house or use a managed solution, Zappush is purpose-built for eCommerce brands that want the data quality of a native CAPI integration without the ongoing engineering overhead.